Technical Articles and Step by Step Procedures
Disclaimer
: These articles and procedures are examples of how and what can be done. These all assume the use of proper tools and the M535i SIG and I take no reponsiblity for any incorrect information posted on this page. If you are not comfortable in undertaking any automotive repair, take your car to a qualified BMW mechanic. Otherwise use this information at your own risk. Like the copyright says any duplication of this information with out the explicit permission of the M535i Special Interest Group & Registry is prohibited. If you run into any specific problems please email me through the link at the bottom of the page and I will try to assist you as best I can. If you have suggestions for improvements or corrections to procedures or other relative information please email them to me through the link at the bottom of the page.First lets start out by saying that the car has two separate gear ratios, that can be changed independently of one another: the tranny ratios and the diff ratios.
For the tranny side of the equation, there are three different trannies used in E28s. First we will concentrate on the two overdrive units. These are the Getrag 260 and 265. The 265 has a removable bell housing and is used in only the '85 model year cars. BMW upgraded to the 260 which has a one piece case, but shares the internals. The 260 parts are stronger and use the following ratios.
First - 3.83These are the ratios for all US spec E28s save M5. Lets look at the third tranny. This is a close ratio, Getrag 262. This tranny has completely different ratios than the overdrive trannies. This tranny has a removable bell housing and often a dogleg first gear. This is a weaker design than the overdrive tranny but has its benefits in the ratios.
First - 3.72Notice the close ratio tranny put 5 ratios in place of the wide ratios 4 and does away with overdrive. In order for BMW to keep the same high speed capability and derivability the differential ratio is different between cars fitted with the close ratio and the overdrive gearbox.
All US spec 535i 's' and 533i came with a 3.25 diff ratio. This diff ratio is always coupled with the overdrive tranny, worldwide. If the car was equipped with a close ratio tranny than the diff ratio was changed to 3.07. This was in order to keep the same speed capability but also maximize acceleration. If a 3.25 diff is fitted to a close ratio equipped car it is like driving an overdrive car without fifth gear. Swapping in a 3.73 into an overdrive equipped car is like having the close ratio/3.07 combination on the highway. The benefit of the close ratio tranny is that acceleration in the upper gears is like having a low differential ratio, but first and second gear do not become stump pullers.
Written by Rob Anderson '00I personally have a 3.73 in my car with the 260 trans. I find that it is great for cruising around 75-80, but above that you get the car on cam. Then it has less derivability. What you need to figure out is what is the cruising speed you will be doing. Lets say on average you will be doing 100 mph. You will have a .81 5th gear. Now I will go through the step by step calculations of how to calculate rpm in a given gear with a given tire diameter, and a given diff ratio.
First we find the circumfrence with respect to miles for the tire size you have. So, the stock car came with 200/60 390s. So here is how you calculate the circumfrence.
Aspect ratio, in this case 60 and divide it by 100, you get .6.The taller you gear the car, aka the lower the number, the slower off the line the car will be. There will be no loss of top speed if you use a 3.73 because our cars can only hit top speed in 4th gear with a 3.25. Now if you put in a 3.73 you will hit a higher top speed but in fifth gear. The reason why it is higher is because you are multiplying rear axle torque by a greater factor therefore pushing the car through the air with greater force. Off the line you will get better acceleration the lower the gear, aka the higher the number. But you will have less fuel economy up top. The best fuel economy occurs right before the car comes on cam. In a stock 535i it comes on cam at approx. 3250. If you gear the car so that you highest cruising speed is at 3250 than you will get them most fuel economy. You do not want to have you top speed occur there though.
Written by Rob Anderson '00You are going to need to get the proper allen sockets that fit into the large hex bolts in the diff. The reason why I say allen sockets is because I have bent many an allen wrench doing this job.
Jack the car up on the diff and place jackstands under the rear subframe. Then lower the car onto the jackstands. Then use the allen socket to break loose the filler bolt. Make sure to do this first because if you can't get it out you don't have a diff without fluid. Once you have this out, remove the drain plug and let the fluid drain. My suggestion would be to not jack up the car very hi so that you can get the most oil out of the car. Once you have emptied it all out, then lower the car all the way back down and let the rest drain.
Jack up just the left rear. Place the drain plug back in and tighten it. Using a long tube, insert one end into the diff and then have a friend pour the fluid into the other end of the tube. Read your capacities section of the owner's manual and it will tell you how much should go in. Another way to do this is fill it until it starts to come out of the filler opening. This has been set at the correct hieght so that it will overflow when you start putting in too much fluid. Then tighten up the filler plug and lower the car down and you are done.
I recommend using Redline oil in the diff and also if you have a limited slip I would also suggest using GM limited slip additive. This works with the limited slip clutches to help prolong the life of the clutches.
Written by Rob Anderson '00First jack up the rear of the car so that both rear wheels are off the ground. Now I usually place jack stands under the rear subframe but if you do not want to place them under the subframe that is fine, place them where you feel comfortable. Now remove the jack(s) and let the rear of the car sit on the jack stands.
Remove the 6 bolts that hold the half shafts to the diff. This is most easily accomplished by having a hex head socket that you can use. With these removed, the half shafts should be easily removed from the diff. By the way, don't be afraid to rotate the half shafts to make it easier to get at these bolts, in fact I suggest it. To hold the half shafts still, put the parking brake on and also put the car in gear. It is not good to have the half shafts hang so I suggest after removing them from the diff to either place blocks of wood under them or to hang them from the body by string.
Next unbolt the driveshaft. To hold the driveshaft still to be able to remove the nuts, put the car in gear and that will hold the driveshaft still. With all 4 bolts removed, you will need to try to push the driveshaft forward in the car. If you don't you run the risk of separating the driveshaft when you pull the diff out of the car. This is a really bad thing to do.
Now that you have the driveshaft and half shafts disconnected, then unbolt the diff from the subframe. Remember to place a floor jack under the diff before you remove all the bolts because remember it will drop on you and it weighs a lot. With all the bolts removed, lower the diff on the jack and roll out from under the car.
When doing this job I suggest replacing your diff mount and also to rotate your half shafts. This is done by unbolting the half shaft where it mounts to the hub and bolting the end of the the shaft that was once bolted to the diff to the hub. This gives greater life to the half shafts.Depending on what diff you are using, you might need to chance the rear cover which is very easily done by unbolting the cover on both the new and old diff and just swapping them. Don't forget to use a new seal, and I suggest using a gasket sealer with the new gasket because if you use a synthetic, most likely it will leak, and this will prevent the leakage. To change the output flanges, use the butt of a hammer handle to pop the old and new shaft out. With them removed, push the new ones in. You will notice that they only going in so far easily. You will need to push them in harder until they are all the way in. this can be done by some hand force or you can use a soft mallet to knock them in.
Now place your new diff in the car and bolt it to the subframe and diff mount. With these bolted in, I also suggest using loctite or another suitable thread locker to prevent these bolts from vibrating loose. Then bolt up the driveshaft and tighten the four nuts that hold the driveshaft to the diff. Then reinstall the half shafts, and remember the spacers that have to go on. I would also suggest that you use thread locker on all of the bolts that hold the half shafts on. I have seen it a couple of times where even at the correct tightening torque, these bolts back themselves out. Tighten the the half shaft bolts to the correct tightening torque which is something like 43 ft lb. Then take off the parking brake and also take the car out of gear and rotate the rear wheels. If you notice anything wobbling then investigate, if not, then you are done. Take the jack stands out and drive the car and make sure there is no vibration of clunking.
Written by Rob Anderson '01I would first look at your diff mount. If it is bad, it will cause the diff to sag which will contribute to poor rear suspension geometry as well as putting excess strain on the universal joint in the driveshaft. Then I would want to check to see if the half shaft ends are still round. They generally oblong which can cause a low speed vibration. Then I would move to the guibo. Check to see if that is good. If you see cracks it must be replaced. Then look at tranny mounts. If they are broken that will cause the tranny to move around under hard load causing a vibration. Also check to make sure the center bearing is preloaded correctly. If it is, it should be deformed slightly towards the front of the car. Also make sure the motor mounts are still good. With all of this checked and/or replaced, if you still have the vibration then most likely you will need a new driveshaft.
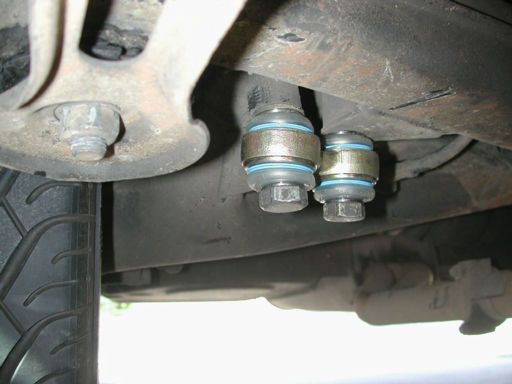
Written by Rob Anderson '01Jack the car up on the front subframe and put the jackstands under the frame rails. You have to then remove the front wheels, making sure to loosen the lug nuts before taking the car off the ground. Once that has been done, using the open end of the 17mm combination wrench, find the 2 notches in the ball joint, on the ball joint side. See Diagram
Do this at both ends of the link and installation is the reverse of removal. Make sure to have the nuts nice and tight and then lower the car down and torque the lug nuts.
Written by Rob Anderson '00First and least likely to cause steering slop is that the tie rods, center link and idler arm in the steering are exceedingly shot. I doubt this or the car would shimmy badly, but you may not feel that because of the second and or third problem.
Second would be that the steering box itself is worn. Many times the power steering fluid isn't replace or is replaced with the wrong stuff. Our cars use ATF(Automatic Transmission Fluid) in the power steering. I have seen more than once a shop put in Power Steering Fluid in the power steering system. This is not good and causes the box and other parts to wear. A temp. fix would be to tighten the adjustment screw on the top of the box and that should eliminate some of the play. If you have a huge amount of play, this could be caused by the box. With this much play I doubt you would be able to feel if the steering arms where shimmying. The way to check to see how much play your box really has is to have a friend turn the steering wheel, only the amount of the play and see if the input to the box is moving. If so, is the output, or pitman arm moving. If not there is your problem.
Third cause. This is also to do with the box and comes in now. The reason why I tell you to check to see if the input to the steering box is moving is because the steering column is actually 2 pieces. These are held together using a large nut, and that nut actually loosens over time. All you would have to do is tighten it up.
Fourth and final. This is the worst and this should be check immediately. This is a grave situation which faces our cars. The mount that holds the steering box to the sub frame actually breaks!!! Yes I said breaks!! It slowly goes until it lets go all together and you loose all steering. BMW had a little known recall/suggested fix that the put out in the early '90s. There is one large long bolt that holds in the steering box. This bolt was inherently weak on the E28 and other cars. They have since upgraded the strength and have superseded the part number. If this is the problem on your car you will need to take it to an experienced mechanic who will be able to weld the brackets back on to the front subframe and reinforce them.
Written by Rob Anderson '00It depends on the year of the E28. The E28 was upgraded to a collapsable steering column in '86. This steering column has a different steering wheel. There are 2 reasons why it is different. The first is that on the old style steering columns the steering lock was in the column, with the collapsable column the lock is actually at the top of the steering column and locks into a hub on the back of the wheel. The second difference is the number of splines in the wheel and on the steering column. If I remember correctly there are more splines on the collapsable steering column wheel than on the non. So even if you could get the wheel to get close to mating, it would not slide on because of the different number of splines, so it all boils down to what year E28 wheel are you talking about.
For those looking at a wheel and wondering if it will fit, here is what the collapsable steering wheel looks like.
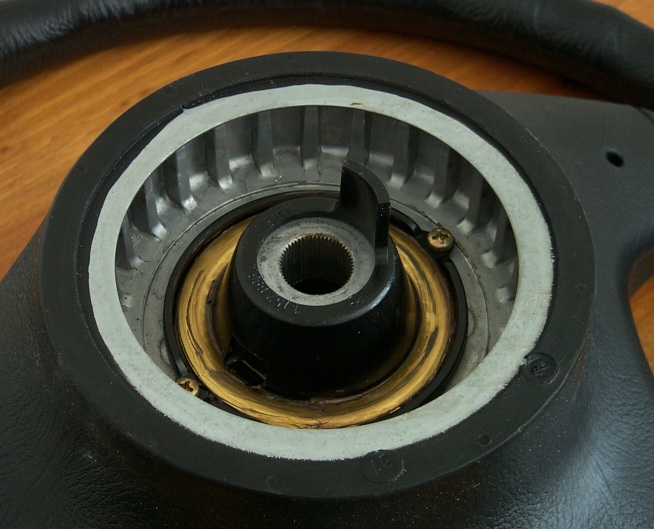
Here is a small list of what wheels fit which cars. For the '86 and later E28s: no airbag wheels fit, but all E30, E34, E32, '86 and later E24, and '86 and later E23 wheels fit. For '85 and earlier E28s: E9, E3, E12, '85 and ealier E24, and '85 and earlier E23 wheels fit. It is possible to change the column over to the later one, but requires quite a few parts. If you want to attempt to change the column to the later column, I would suggest finding a donor column from a wrecked car as the parts are expensive from BMW.
Aluminum Lower Control Arms from any and all E34s bolt into our cars. These aluminum control arms generally have few advantages over the steel ones. The first is that they weigh less, and the second is that they are slightly stronger. This is a must for those who spend lots of time on track but from my personal experience, they don't last much longer than steel control arms but cost quite a bit more. The decision is up to you, but my 5 has steel arms. Here is a picture of the aluminum arm.

A clunking in the front suspension, can be a couple of things. First I would think that it would be the upper strut bearings. The way to check this is to find a bump on a secluded road and have a friend drive the car very slowly over the bump with the hood open and your hand on the upper strut bearing. If you feel the clunk in your hand then it is most likely either the upper strut bearing or the shock. The next thing to look at is whether the bearing is deforming or the strut is moving and the bearing is not. If the rubber of the bearing is deforming then you have a seized strut. If the strut moves and the bearing does not deform then I would suggest replacing the bearing. The clunking can also be caused by very badly worn ball joints, but I doubt that if you have no shimmy problems.
Written by Rob Anderson '01A couple of months ago I contacted you about putting Koni's on my E24. The folks at TCKline were great in working with me on this and although there was somewhat of a wait for the parts, as of today my '87 is now wearing Koni Sports (rebound-adjustable) front and rear. It has completely transformed the ride characteristics of the car. It no longer feels like a 15 year old car with 205,000 miles. In fact, my wrench (Bill Rudtner at Rudtners Racing) went for a test ride after the installation and came out with a big grin! This from a guy who's the Technical Advisor to both the NY CCA and PCA chapters!.
Despite having previously done other suspension maintenance and mods including new control arms, bushings, tie rods, 750i front brake upgrade, ditching the TRX's for 850i rims with Dunlop SP5000 225/50/ZR16's, none of these changes really "clicked" until now. Finally, the benefits of all that work is paying off! I know you and I are in the minority when it comes to advocating Kon's, but heck, we just need to convert people one at a time!
Thanks for your advice and encouragement.
Written by Roger Katz '02You must jack the car up by the differential and then place the jackstands under the rear subframe. Safety first. Then use the 13mm wrenches to remove the bolt that holds the link to the U shaped clamp on the trailing arm. Then pull the link off of the swaybar. To install the new link I would suggest using a mixture of soap and water and rubbing it in the rubber bushing. This makes it easier to push on to the swaybar. Then bolt the bottom of the link back into the U shaped clamp and torque to 16-18 ft pounds.
Written by Rob Anderson '00The E34 rear shocks are a bolt-on modification for the E28. This is a good option to obtain the higher levels of damping required for stiffer suspension set-ups. However, the major ill-effect of this is that it raises the ride height of the E28 by about 1". This is true for Bilsteins and Konis. Both sets of rear E34 shocks (Bilstein Sports, PN B46-1486, and Koni Sport Yellows, PN 8240-1076Sport) will do this, and both sets do not have adjustable spring perches for the ride height. The Bilstein's spring perches are not welded, which could allow for custom spring perches to be manufactured and bring down the ride height. Koni's spring perches are welded in. Thus, you will need to rework the shock body in some manner that could void their warranty in order to fit them to the E28 and allow for correct ride height. Either way, there will need to be some customization or fabrication to allow them to fit correctly.
Written by Christopher Graff '04The rear toe link or rear pitman arms, are a source of common problems in handling of the E28. This is because these units are designed to control the amount toe change while the suspension moves. When these bushings wear out, it can cause a clunking noise in the rear of the car over bumps and can also cause these cars to be a handful in the wet. They are very simple to change and can be purchased through any BMW dealer or Maxamillian. The replacement of these bushings can usually be done without removing the wheel or jacking up the car. If you have clunking, or feel that your car has bad wet weather driving characteristics than check these bushings. Basically, if the dust boots are broken they need to be replaced. Here is a picture.
Basic guide to springs and sway bars. The following shows a basic guide to the springs generally available for the E28. Included is the Spring manufacturer, the front spring rate (for comparison purposes only, and estimated in some cases), and the lowering amount for a stock 535i.
If you measured the width of the wheel, for example an 8 inch wheel. You then find the mid-point of that which would be 4 inches from the edge. The the hub on the wheel, where the wheel bolts to the car, is 4 inches from both edges of the wheel you have a 0 offset. This means that you have 4 inches off of the hub, or towards the outside of the car, and 4 inches inside the hub, or towards the inside of the car.
If we look at American cars for a second, as the offset number increases, the further off the hub the wheel sits, on an AMERICAN CAR. BMWs are the opposite. We have what is considered to be negative offset. This is because as you increase the offset number value on a BMW, the further inside the hub the wheel sits. That is why our offset is measured in ET. That takes into account the negative.
Now for an example. We will use my Hartge wheels. In the rear I run 16x8.5 wheels. The offset is ET25. This means that the wheel sits 25mm further inside the hub than an offset of ET0. So, that means that instead of having 4.25 inches on either side of the hub, I have approx. 5.25 inches inside the hub and 3.25 outside the hub. Now on the front I run 16x7.5 wheels. The offset is ET15. This means that the wheels sits 15mm further insider the hub than an offset of ET0. So, instead of having 3.75 inches on either side of the wheel, I have approx. 4.25 inches inside the hub and 3.25 outside the hub. Now you ask how does this effect the fitment on the car.
Well on a BMW there is generally more room on the inside of the hub than on the outside. The fender well is a finite width, unless you modify it, and the hub sits a specific distance from the outside of the fender well and the inside. The higher offset number you have, the further towards the center of the car the wheel sits, so therefore the less chance of having the tire rub on the outside fender. But for example I tried putting my 16x8.5 wheels on the front of my car. The problem I found was that I cannot bolt the wheel to the hub because the strut tube hits the inside of the tire. So on the front there is only so much distance between the hub and the strut tube. This is what generally governs front offset. In the rear though, the clearance on the fender is what governs offset. Depending on the width of the wheel and the offset, you may or may not have to use a spacer. What a spacer does is change the offset number to what you want. So if I had a wheel with an ET35 I could use a 10mm spacer to get the wheel back to an ET25. But if you get a wheel with too low an ET number than you may have to mill the hub of the wheel down to get the correct offset.
Written by Rob Anderson '00OK you say you have ET11, so your wheels stick pretty far off the hubs huh? Do you have a picture of the car with those wheels on it? Here is what I say, what tires are you running now? BMW used a 16x7 with an ET of 20, so you should have nothing to worry about with getting the 225s to clear the strut tubes. But you might have to severely roll the fender lips front and rear. ET11 means that the wheels are sitting quite a ways off the hubs. For example I am running 8.5s in the rear with an offset of ET25. They required rolling when I lowered the car. Therefore we will do some math.
I currently have 8.5s with an ET25 that means that my wheels are 215.9mm wide. Now to find the center line, or ET0 I divide by 2. 107.95 Now if I have an ET25 that means that the wheel sits 25mm further in towards the center of the car therefore making it so that I have 82.95mm from the hub to the outside of the rim. And I have 132.95 from the hub to the inside of the wheel. Since I had to roll my fender lips with the 8.5s we will do the math for your wheels and see if they will fit.
You say you have 7s with an offset of ET11. Now your wheel is 177.8mm wide. Therefore we divide by 2 to find ET0. 88.9mm Now you say you have ET11 so that means that you will have 99.9mm inside the hub, towards the center of the car. And you will have 77.9mm outside the hub. Ok so your wheel is actually further away from the fender lip than mine.
Now we will figure out if you can fit the 225s in the rear. I run 245s, which are exactly 29.1mm wider than my wheels. This means that they stick out on either side of my wheels by that much. So we divide by 2. 14.55 This is how much my rear tire sticks off of my rim on the outside. So if you measure the distance from the hub to the edge of my tire you will find that it is 97.5mm. Now with that width I had to roll the fender lips.
This is what you will have. Your 225s will stick 47.2mm outside of your wheels. Therefore on the outside they will stick out 23.6mm. So your distance from the hub to the outside of the tire is 101.5mm. Therefore you will have to roll your fender lips more than I have to. What this means is that your rear tires will sit 4mm further towards the outside of the car than mine. This may not seem a lot, but it will require some serious fender lip modification, especially on a lowered car. As for the fronts we will use my front Hartge's to compare to.
I have 7.5s on the front of my car with an ET15. This means that I have 110.25mm inside the front hubs and 80.25mm outside the front hubs. Now you are using the same wheels front and rear so I will copy and paste the previous calculations.
You say you have 7s with an offset of ET11. Now your wheel is 177.8mm wide. Therefore we divide by 2 to find ET0. 88.9mm Now you say you have ET11 so that means that you will have 99.9mm inside the hub, towards the center of the car. And you will have 77.9mm outside the hub. Ok once again your wheel is actually further away from the fender lip than mine.
Now we do the tire calculation again and we find that I run 225s on the front of my car. So the tire sticks off the rim a total of 34.5mm So the measurement from the hub to the outside of the tire is 97.5mm. Now I have not had to modify anything on the front of my car but I am also running 1.25 degrees of negative camber.
As per the previous calculations, you would have a distance from the hub to the outside of the tire of 101.5mm. Therefore again your wheels will sit futher off the hubs and would require more rolling or may require rolling in the front. As for strut tube clearance, you are fine, but when you start talking about clearing the body panels, I don't think it will be very easy.
Written by Rob Anderson '00Remove the driver's side kick panel. Place car on slight incline, not very steep or you will not have a car. Steep enough for the car to be able to roll on its own. You then locate the top of the brake pedal. You will see an aluminum U shaped bracket with a pin through it attached to the brake pedal. If you follow this U shaped bracket, you will come to a lock nut and then a threaded rod which goes into the brake bomb. Once you have located that, loosen the lock nut. Then place the car on the hill. MAKE SURE YOU LEAVE THE CAR RUNNING! Otherwise you will never be able to adjust it properly. OK here is the tricky part, where if you are not careful you can loose your car, so I suggest having a friend in the passenger seat manning the parking brake. You leave the driver's door open and while outside the car on your knees, you actuate the brake pedal. You use a pair of pliers or you hand to rotate the threaded rod in or out of the U shaped bracket. By doing this, you are adjusting where the brakes pick up. To test, you put you hand on the brake and tell your friend to take of the parking brake. You then slowly release until you feel the car start to move and then you put it back on. I would not suggest getting it too tight because like I found once, there was a very small air bubble in my brake lines and the brakes seized on, which was not fun. I leave 5mm-1cm before anything happens so that I will never run into this problem again. After getting it to the proper positioning, tighten up the lock nut and driver the car. See if you like it, and if you don't work at it some more. Once you get it to where you like it, button everything up and don't worry about it anymore. Very easy to do and makes the car a lot more fun to drive because you get much better feel through the pedal I found.
Written by Rob Anderson '00After upgrading the brakes on an E28, the best way to get the feel through the pedal you have always wanted is with stainless steel brake lines. I would personally use Earl's lines for an E28 M5. The front lines are slightly longer than the 535i, and so that will take up the slack for the different caliper input. If you are still running the 535i calipers and better pads, the 535i lines work great. They are the best quality I have found and you should have no problems putting them on. Many people put E34 brakes on their cars and ask the question of whether they should use E34 lines or E28 lines, since the part numbers are different. My answer to this is, "I say use the E28 M5 lines." The reason why the E34 lines are different is because the pick-up points on the body are in a different location, therefore requiring different length lines.
Written by Rob Anderson '00What has happened is that the ABS system has detected a fault in the reading of the vehicle speed. This can be caused for a variety of reasons, but these are the most common.
First, you want to clean the ABS toothed wheel. If the ABS sensor cannot get the pulses from the wheel, then the system will register a fault in the speed readings. These wheels can have dirt lodged in the teeth, chipped teeth, rust, all sorts of things. If you have a chipped tooth on the wheel, you will have to replace it. More often than not, it's just rust or dirt.
Second, you want to clean the ABS sensor itself. It is simple enough to remove the sensor (a couple screws and pull out), but be careful because they are plastic and can break if you're not careful pulling them out.
If cleaning the wheel and sensors doesn't work. Replace the sensors. Or try to find a working set to swap to see if you can pin point the bad sensor. They are pretty fragile, so be careful pulling them in and out.
The reason why the ABS light doesn't come on immediately when you start the car is because ABS works only above 5 mph or so. Only after you go that speed it then attempts to read the signal. Unfortunately the signal is bad and the system then disables the ABS, and the light goes on.
An example of a failure method is having the sensor not read the teeth. In effect it is not sending out a pulse. The other wheels are. The computer reads the pulses as the speed of the wheels (the faster the pulses, the faster the speed), so when the computer reads the speed for the 3 wheels, and no speed for the other (because there are no pulses), it registers an error. You're not applying the brakes (so it's not like a wheel is locking up under braking which would cause the pulses to stop because the wheel isn't moving), so the computer realizes there is a problem with the sensors and disables the system. If it wouldn't do this, when you'd brake, the ABS would activate, and the brake on the wheel with the bad sensor would not activate because it reads it as if the wheel were stationary. That means only one side of the car at that end would brake causing you to veer off. Not a good thing.
Written by Chris Graff '00Here are an example list of stages of braking upgrades and the minimum wheel size you can safely fit. The amount of benefit you receive from the upgrade is mainly dependant on the pads and rotors you use.
Stage 1: E32/540i frontsWe recommend against slotted or cross-drilled rotors for use in daily driving application, and most other applications. In our experience slotted rotors give a different and strange vibration feeling through the pedal. This can be disconcerting in normal street use and even worse on track. We have also found that slotted rotors have a tendancy to wear out pads very quickly. Cross-drilled rotors are generally more susceptible to cracking, and also increase vibration. Good quality normal rotors are best for almost all applications, including track use (for example, Balo rotors).
Good, dustless or low-dust street pads are recommended as the following (these are just a few examples, there are many other manufacturers of brake pads that offer good products).
Best Value recommendations:
1. E32/540i Front brakes (Stage 1)Best Performance Recommendation:
1. E32/540i Front brakes; E32/E34 vented rear brakes (Stage 5)Ultimate Performance:
1. E34/E32/E31 Nurburgring BrakesRichard Nott�s Database Information Corrections:
Below in italics are quotes from Richard Nott's Database (http://member.rivernet.com.au/btaylor/welcome.htm), which are from compilations from online message boards or email lists. Much of the information at the website is a good starting point; however, it is not all correct, and this is the aim of this article to follow.
E32 calipers need the E32 master cylinder to work properly.
This is a complete misconception. The E32 master cylinder is required for bigger brakes simply due to the fact that you need to push more fluid in the calipers (due to bigger/more pistons) than the original calipers, in order to keep the mechanical advantage. Remember that the E28 M5 had the same brake master cylinder as the regular 535s; and the E28 M5 uses the 4-piston front calipers which move roughly the same amount of fluid as the E32 or standard E34 front calipers.
Also, the fact that the E32 and E34 were so much heavier than the E28 was another factor in installing the larger master cylinder in those cars. An E28 with E32/E34/or E28 M5 front brakes and E34 rear brakes does NOT NEED an E32 master cylinder. In fact, it can be detrimental to pedal feel. In a well maintained braking system, the E32 master cylinder can significantly reduces pedal travel, especially if you also have stainless steel lines with E32/E34/E28 M5 front calipers and E34 rear calipers. It can reduce travel to a point where you can not effectively modulate brake pedal pressure at threshold braking. This is detrimental to high performance driving (e.g. track or autox).
If you install SS lines without bigger-volume piston'ed front calipers (IMO) the pedal ends up unacceptably 'sharp'. However, ABS equipped cars can loose some of the spongy pedal feel by using SS lines.
This is completely wrong. Stainless steel lines help in reducing the fluid volume compliance. This improves pedal feel by reducing �sponginess� feel in the brake pedal by reducing the fluid compliance within the system. It will not, in and of itself, make the pedal unacceptably �sharp�.
In addition to lines, choice of brake pads also influence overall pedal feel and brake response. Pad choice can also affect the �sharpness�, �touchiness�, or �dullness� of the braking, and even can affect dead travel.
What is significant in sharpness is the feeling when you �jump� on the brakes. All other variables being equal, with the bigger master cylinder, the reduction in pedal travel for the same amount of braking force can lead to a feeling of excessively sharp or touchy brakes.
The E32 brakes will fit under 15" wheels. These are your best choice for economy... and will be capable of handling just about anything you would do with your 535i. E32 750iL front rotors are vented from the inside rather than outside around the "hat".
The E32 rotors are vented internally, which allows better cooling in most everyday driving situations. However, M5 brake rotors are externally ventilated. With the correct choice in wheels (as evidenced with the E34 M5), that combination is more effective at brake cooling (without custom brake ducts)
The biggest reason to for E32 brakes is best economic value (initial cost and consumable costs).
The 540i/6 fronts may be considerably cheaper the E34 M5 and are the same size. The stock E28 ///M car brake bias is calculated at 73% front and 27% rear. The upgrade to E34, M5 rear brake will change the bias to 66% front and 34% rear.
The 540i/6 fronts are not the same size as the E34 M5. They are only 300mm. However, they are thicker rotors than the normal E34�s (like the E32�s). Check the part numbers.
the E28 M5 used the same rear rotors as the 535i. Which should tell you how important rear brakes are in the big scheme of things. An increase in pedal firmness can be gained by installing the master cylinder from the E-32, 750 that has a 25mm cylinder bore.
Brake bias is extraordinarily important for correct balancing of the car. The reason the E28 M5 had such an �off� brake balance is due to its weight distribution (roughly 54% front, 46% rear). Similarly the stock 535i had pretty �poor� brake bias. Increasing the front brake bias means that the front brakes are more likely to lock up before the rears, thus giving a nice cushion of safety (understeer) with ABS. More rear bias will generally tend to make a car more responsive in handling and turn-in better (while braking). The E34 brake bias was further rear due to it�s near 50/50 weight balance, and the requirement for correct bias for its weight balance.
The brake bias table is listed below (calculated from brake torques):
Stock E28 535i: 72.8% / 27.2%
E28 M5 front set-up: 73.8% / 26.2%
E28 M5 with E34 rear (vented or non): 64.3 % / 35.7%
E32 7-series front alone: 76% / 24%
E32 fronts with E34 rears: 66.9% / 33.1%
E34 M5 front with E34 rears: 68.2 % / 31.8%
E31 fronts Brembo with E34 rears: 70.5% / 29.5%
The ideal brake balance for high performance driving [with a roughly 52/48 weight distributed E28 535i] is actually the E34 M5 fronts with the E34 vented rear brakes. The E28 M5 front calipers with E34 vented rears moves the bias more rearward, and thus can be more beneficial in on-track situations for handling (turn-in). Similarly, all other things being equal, E28 M5 calipers give better feel than the E32 front calipers due to their multi-piston, fixed caliper design, which increases stiffness over the floating caliper design.
To make an E34 535 out brake 540's, be on par with E34 M5's and have the same brake reaction times as the M3 Lightweights, The E34 rotors can be gas slotted, but needs to be done by an experienced race shop. You then add super blue fluid, and install a street/track carbon-kevlar pad set, (or similar) but this is only suited to the track, as the pads take time to warm up. On the street the pads will wear out 15% quicker. Personally I would change the pads to Deluxe or Metal Master. Metal Masters handle harder driving, but don't stop as well cold as the Deluxe. Deluxe don't dust, are good when cold and don't chew out the rotors like Metal Masters.
Recently, I went to E34 M5 fronts (same caliper, 315mm rotor). For the track, this setup is great, but probably not worth the extra money on the street, as the M5 brakes are very hard to find.
As I mentioned below, the E32 750il master cylinder is also highly
recommended.
-------------------------
The 540i calipers, carriers and rotors - both front and rear - are a
bolt-on for the E28/E24.
In addition, the E34 M5 calipers, carriers and rotors - both front and rear - are a bolt-on for the E28/E24.
The only differences between the two are the front carriers and rotors.
The M5 carriers must be used with M5 rotors, to accommodate the larger
diameter.
-------------------------
While it's true the 540i/740i/750i front brake calipers are the same,
the caliper bracket and rotor are different. The bottom line is, you'll
need to get a complete M5 kit, since the brackets are very difficult and
expensive to get separately.
....
2) I believe that 540i/6 fronts are the same 315mm x 30mm as the E34 M5,
and may be considerably cheaper
Again, this is false. The 540i/6 fronts are not the same as the E34 M5 fronts. They are the 302mm diameter E32 type. You can check this with any parts list or parts catalogs.
However, the M540i/540i Motorsport limited edition model came with the E34 M5 3.6 front brakes (the 315mm diameter ones). That limited edition model also came with a host of other M5 components (for example, sport seats, front spoiler, and the electronic damping control).
Note on going with TOO big brakes: Unsprung Weight and inertia
There is one important aspect to consider when looking at upgrading brakes - your brakes are unsprung weight. Unsprung weight is an important aspect to suspension tuning, and excessive unsprung weight can be a problem as it detrimentally affects handling and damping.
So, for comparison purposes, below are the total (left and right) unsprung weights of different front brake packages. (All weights are referenced from the ETK).
E28 stock front brakes, floating caliper
Pad set: 1.806 kg
Caliper & carrier: 4.57 kg ea
Disk: 6.148 kg ea
Total (L&R): 23.2 kg
E32 7-series front brakes, floating caliper
Pad set: 1.986 kg
Caliper & carrier: 5.2 kg ea
Disk: 8.08 kg ea
Total (L&R): 28.6 kg
E28 M5 / E24 M6 front brakes, 4-piston
Pad set: 1.5 kg
Caliper: 5.0 kg ea
Disk: 8.64 kg ea
Total (L&R): 28.7 kg
E34 M5 3.6 front brake, floating.
Pad set: 1.896 kg
Caliper: 5.14 kg ea
Disk: 9.36 kg ea
Total (L&R): 30.9 kg
E31 Brembo, 4 piston
Pad set: 2.005 kg
Caliper: 3.4 kg ea
Disk: 9.74 kg ea
Total (L&R): 30.3 kg
E31 front brakes, floating caliper
Pad set: 2.047 kg
Caliper: 5.87 kg ea
Disk: 9.74 kg ea
Total (L&R): 33.3 kg
Written by Chris Graff '05
Rebuilding Brake Calipers
As our car age, various things go wrong that you would not expect to have happen on a new car. Some of these problems most DIYers don't think twice about attempting, but there are some things that most people shy away from. For example, the average DIYer will have no problem doing a brake job, but when they find out that they have a stuck caliper, many just think that their only option is to purchase a remanufactured unit through a dealer or Maxamillian. Well, this is not the case, BMW and Maxamillian sell what are known as caliper rebuild kits. These kits come with all of the necessary rubber O-rings to rebuild a caliper. Now lets say you have a stuck caliper on your M535i, and you have decided that you want to attempt to rebuild your own caliper(Which is not something I suggest to an inexperieced DIYer).
First, you need to remove the outer dust boot. Once this is removed you must remove the piston out of the caliper. To do this you can use one of three ways. The first one is to just push on the brake pedal until it pops out. This is accomplished by having the rest of the brakes on the car and working correctly, then you unbolt the questionable caliper from the trailing arm or strut tube and then you remove the pads. Once this has been done, then you have a friend push on the brakes. You will see the piston start to move. Now you will want to have a catch can under the caliper because as soon as you get the piston out the brake fluid that was in the reservoir and in the brake line will come out. Be careful to catch the piston when it pops out because you don't want to damage it. This is an easy way of removing the piston, but you will find that you can only do one caliper at a time and then you have to bleed the system before you can do a second one. It is also difficult to rebuild the caliper with it still attached to the brake line. So the second and third way involve removing the caliper completely from the car, this is also the preferred way to rebuild a multi-piston caliper like those lovely E28 M5 calipers that you just bought to put on your car. The second way to remove the pistons is to used compressed air. In the port that the brake line screws into, you pump compressed air into the caliper and this will push out the piston. This is the preferred way to do this step. Now, some of us who have rebuilt quite a few calipers have found that the fluid, and the compressed air won't loosen the piston. Well don't worry, there is one more way of removing the piston. This involves using a vise grip and a vise. First you clamp the vise grip to the piston with as much force as you can. Now remember, you only want to clamp it to the unmachined surface. This is the area that is in direct contact with the pad. You will notice that it has a small diameter then the rest of the piston. Once you clamp the vise grip on, then you place the handle of the vise grip into the vise and tighten it down. Now you need to grab the caliper with both hands and try to rotate the piston in the bore. This is made easier by plenty of releasing fluid. Once you have gotten it to rotate in the bore then you need to carefully pull the piston out of the caliper by pulling and rotating at the same time. The reason why you do both at the same time is because you want to make sure that you don't cock the piston in the bore. If you cock the piston you will find that you can damage the caliper bore. Now, people with the M5 multi-piston calipers will be asking, how do I get the vise grip on the piston. Well what you need to do is unbolt the two halves of the caliper. There are four bolts that hold the caliper together. Once you have removed these four bolts put them in a safe place because they are no longer available from BMW. You will also notice that there are two spacers, and four small O-rings. Non of these parts are available from BMW anymore, so it is important not to lose them. I suggest that once you have the small O-rings out that you soak them in NEW brake fluid. WHEN REBUILDING CALIPERS ONLY USE NEW BRAKE FLUID!
Now that you have the piston out, you open your rebuild kit. There is a larger rubber O-ring in the kit. This O-ring is actually placed in a groove in the caliper bore. You need to remove the old O-ring. Then it is time to clean out the caliper. This is easily done with compressed air, but can also be accomplished by plenty of brake parts cleaner. Once you have cleaned out the caliper you need to inspect the bores. If you see any rust in the bore, you will need to clean it out. This is done by carefully and I mean carefully using some emery cloth on the rust spot. Now that you have gotten rid of the rust spot, you need to inspect the bore for any scoring. If there is some slight scoring you can probably smooth it out with the emery cloth, if there is deep scoring you will need a new caliper. Once you have cleaned and inspected the bore you will need to coat it thoroughly with brake fluid. Then soak the new rubber O-ring in brake fluid and install. Make sure that the seal is not twisted in any way. Now you need to clean any rust off the piston and also inspect it for scoring marks. Once you have cleaned it and inspect it, you can cover it in brake fluid and carefully reinstall it in the bore. You must be very careful doing this because you need to make sure that you don't cock the piston. But unlike removing the piston you cannot rotate and install the piston at the same time. You need to push the piston in by hand. You will know if the piston is cocked because it will become very very difficult to install. Now remember you will need to get the piston by the rubber O-ring so don't mistake getting the piston by the O-ring with it being cocked. Now that you have the piston back in you need to put on the new dust boot. Once you have that on, the piston caliper is back together. And for those with the M5 calipers, you will need to bolt back together the two halves of the caliper. Make sure to clean everything and wet it down with break fluid. Also make sure you reinstall all of the small rubber O-rings and make sure not to pinch them. Once everything is back together, I suggest for your floating caliper to use high temp. wheel bearing grease on the guide bolts. This will ensure smooth operation of the caliper. Bolt the caliper back onto the car and bleed the brakes.
Now you have successfully rebuilt your caliper and probably saved yourself at least $100 for each caliper.
*The E28 M5 caliper is just like any other multi-piston BMW caliper and so the techniques can be applied to all multi-piston BMW caliper.
Written by Rob Anderson '01BMW started back in the late '60s and early '70s denoting their bodies with an E and then a number. They also have denoted their motors by an M and then a number, or in special cases an S and then a number.
Here is how the E worksAs for the motors BMW started with the original 4 cylider and has gone from there.
M10 - Four cylinder found in 2002 and 320iM motors go by a different designation. They use S.
S14 - E30 M3 motor based on M10.Autocrosses are cheap, fun way to push you (and maybe your car) to its limits and learn how to drive. Contact your local BMW CCA chapter (most have websites with the schedule up anyways), and see when the autocross season starts. Autocrossing, for those who don't know, is a form of racing/timed event held in parking lots. The organizers set-up a course that twists and turns, usually with a few chicanes or "gates", and usually with a slalom area as well. Each "lap" lasts between 30 seconds and change, all the way to 1 minute and 30 seconds. Each driver gets between 3 and 6 runs per session, usually. And there are 2 sessions (morning/afternoon). And you usually don't end up going faster than 60 mph. Most corners are done in second gear around 20-40 mph. Gates or chicanes you *might* use 1st, but more often than not you shift once, on acceleration from the start, into second, and leave it there for the lap.
Autocrosses are a great way to learn how to drive well at the limit. They're inexpensive (you can even borrow helmets from the organizers usually), and very fun. The more you do, the more you learn how to handle oversteer/understeer and other driving situations. You learn how to drive the car, and not let it drive you. Not only that, but since it is relatively low speed, if you do spin out or get in trouble, all you end up hitting are cones. There is no grass, walls, trees, etc., that you have to worry about like at a driver's school. (Interesting experience: One funny thing, I ended up locking my wheels going into a very sharp corner at an autocross once. About 35 to 10 or 15 mph braking. The interesting thing was that I was at the limit of braking (without engaging ABS), and I guess that at that slow(er) speed the wheels all locked up at the same time or in a similar fashion in that the ABS didn't engage...oh well. Hit a cone...2 second penalty...that's about it, didn't happen again afterwards. Hey, it was only my second lap.)
Anyway, my point is that many of you out there know your cars well and enjoy to drive them on a regular basis on the street. But, you have an entirely different character to your car that you do not know about. It's the fact that these cars are made to handle extreme driving conditions. Once you've done a few autocrosses or driver's schools in a BMW, then you'll realize that you have a helluva piece of engineering. You will be AMAZED that anyone can build a car that can not only be reliable and handle everyday chores, but hold its own at driving events.
Remember though, that you have a 3200 lb-ish car, with relatively antiquated suspension (versus newer BMWs), so don't expect the big 5-er to be as fast as...say 3 series or M3s out of the box. This is why the more nutty enthusiasts here want to modify our cars... hehe... But, also remember that at an autocross, a good driver is worth at least 5%, if not more, of the lap time. I know for certain, that if Ed Walters drove my car, he will pull 2-3 seconds on me, guaranteed, within a couple laps.
In any case, this will definitely get most of your "enthusiastic driving" out of your systems so you don't endanger the general public (just j/king), and make you a better driver. I can attest to the fact that Autocross experience has saved me at least 2 times in winter weather driving.
And let me just add, PLEASE FLAG! Autocrosses can only be run if there are people willing to work. Just think that is a way to get a T-shirt tan and be really close to the action. Most flaggers only have to reset the cones that others knocked over.
Written by Chris Graff '01